WELCOME
  • Home
  • Biology
    • Matter and Energy >
      • Building Data Tables
      • Graphing
    • Cell Transport
    • Animals >
      • Cells
      • Cellular Respiration
      • Digestion Biosynthesis
      • Biomolecules
    • HLA Matching
    • Plants >
      • Plant Structures
      • Photosynthesis
    • Mitosis
    • DNA to Proteins >
      • Double Helix >
        • X-ray Crystallography
      • Enzyme Lesson
    • Genetics
    • Evolution >
      • Battling Bacteria
      • Moth Gizmo
      • Mouse Evolution
      • Evolution and Disease
      • Evidence of Evolution
    • Ecology >
      • Ecology Reading Assignment >
        • Nutrient Cycles
      • Carbon Pools Reading
    • Ecosystems >
      • Animal Flash Cards
      • Human Impacts on Environment
    • Ecocolumns
    • Disease >
      • Disease Reading
      • Immune System Response
      • Emerging Diseases Project
  • FAQs
  • SEP labs
    • Transformation >
      • Transformation Procedure
    • HLA Sequencing
    • PCR
    • ELISA
  • DNA Extraction Cards

Transformation Protocol

Part 1: Prepare Tubes

Purpose: Sterilize your workspace to reduce the chance of contamination. Set up your control and pFLO transformation.
  1. Disinfect your work space by cleaning with 70% ethanol. Wash your hands before doing any work.
  2. Label the 2 sterile 1.5 ml microtubes.
    1. One microtube will be for the control. Label this tube “C”.
    2. The other microtube will be for pFLO transformation. Label this tube “pFLO”.
    3. Label both tubes with your lab station, period (example: P1G1 - for period 1, group 1), and the date.
  3. Use a p1000 to pipette 250 μl of cold calcium chloride solution (CaCl2) into each tube.
  4. Return the tubes to your lab station and place both tubes on ice.
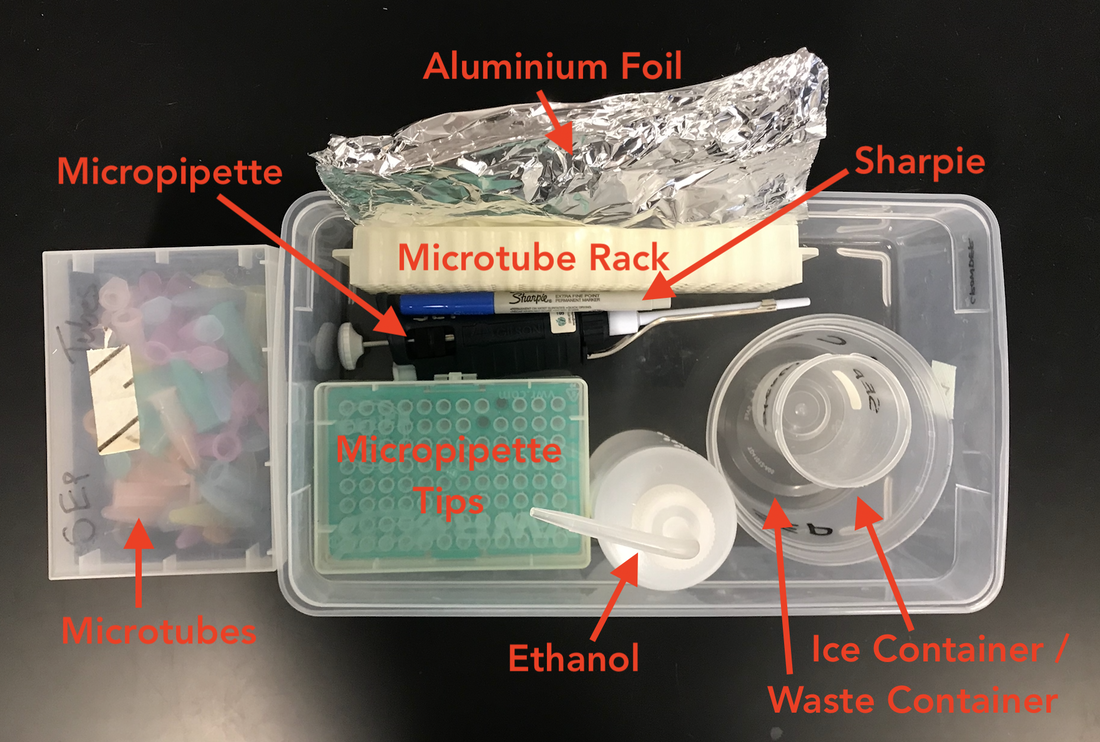
Tubes are located at your lab station. 

Calcium chloride and micropipettes are located on the table near the chemical shower. 

Ice is located in the back of the room. Your ice container is at your lab station. 

Part 2: Add Bacteria to Tubes

Purpose: Each colony on the stock plate originates from a single “mother” cell. Selecting a single colony ensures that all the bacteria you’ll be growing and transforming are genetically alike. The plates we will be using were made from a single colony so all the bacteria on the plates should be genetically alike.
  1. Carefully remove a sterile bacterial spreader from the container.
  2. ​​Using the round side of the bacteria spreader, gently scrape up a a tiny amount of bacteria from the stock plate.
  3. Insert the bacteria spreader into the control tube and vigorously tap or twirl the end against the side of the tube. - dispose of the spreader in the waste container. Return to your lab station.
    1. Check that there is a clump of cells in the solution. (You might not see anything if your clump of cells was small)
    2. Use a sterile transfer pipet to suspend the cells by pipetting up and down repeatedly. Check that there are no clumps visible.
    3. Return the tube to ice and discard the transfer pipet.
  4. Using a new sterile bacteria spreader, transfer another colony of bacteria to the pFLO tube just as you did for the control.  - dispose of the spreader in the waste container. Return to your lab station.
    1. Check that there is a clump of cells in the solution.(You might not see anything if your clump of cells was small)​
    2. Use a sterile transfer pipet to suspend the cells by pipetting repeatedly. Check that there are no clumps visible.
    3. Return the pFLO tube to ice and discard the transfer pipet.


Bacteria are located on the table by the chemical shower. 

Open the bacteria spreader at the pointy end you do not contaminate the round end when you pull it out of the sleeve.

Sterile transfer pipettes are at your lab station.


​

​

​

Part 3: Add Plasmid to Bacteria

Purpose: Transform bacteria with the pFLO plasmid to express antibiotic resistance and the gene of interest. There are three different types of pFLO plasmid. Each is a different color. Chose one color for your group.
  1. Using a 2-20 μl micropipet and a new tip, add 10 μl pFLO plasmid to only the pFLO tube.
    1. Once added, mix by closing the tube and tapping or flicking the tube with your fingers.
    2. Return the tube to ice.​
  2. Using a new tip, add 10 μl of sterile water to the control tube.
    1. Once added, mix by closing the tube and tapping or flicking the tube with your fingers.
    2. Return the tube to ice.
  3. Wait 15 minutes. This gives time for the pFLO plasmid to settle onto the surfaces of the bacteria. While you’re waiting, think ahead about the next two steps. The timing of these steps is important to the success of the procedure. 
The plasmid is in a freezer box on the table near the chemical shower. 

p20 micropipettes and tips are on the table with the plasmid.

Sterile water is on the table by the chemical shower. 
​
Use the timer on your phone or Chromebook. 

Part 4: Heatshock

Purpose: The CaCl2 and heatshock alter the cell membrane of the bacteria so that foreign DNA can pass through more easily. These cells are called “competent”. This is an essential step for successful transformation. 
  1. When the 15-minute waiting period is over, take the ice container with the pFLO and control tubes to the 42°C water bath (check the temperature).
  2. Transfer the tubes into a floating tube rack.
  3. It is essential that cells are given a sharp and distinct heat shock. 
  4. Place the rack with the tubes in the water bath for exactly 90 seconds.​
  5. Return the tubes to ice immediately after the waterbath. Wait at least 2 minutes
  6. Using a P1000 micropipet and sterile tip, add 250 μl of sterile Luria Broth (LB) to each tube. Tap each tube with your finger to mix its contents.
  7. Recovery Step: Incubate tubes for 10 min at 37°C. This allows the bacteria to recover from heat shock before plating them on ampicillin.
There are two hot water baths near the goggles. Make sure you are using the 42 degree hot water bath for the heat shock. 

Use a foam floaty to keep your tubes upright. Make sure the tubes are closed tightly before putting them in the water bath. 

The water is not hot enough to burn you but don't touch it more than you need to. 

The p1000, tips, and Luria Broth are located on the table near the chemical shower. 


​

Part 5: Plating Cells

Purpose: To spread individual cells evenly over the surface of the plate resulting in visible colonies after incubation.
  1. Label plates:
    1. Obtain 1 LB plate and 1 LB/amp plate.
    2. Handle the plates carefully so that they remain sterile while you label them.
    3. Turn over the plate and draw a line down the middle of each plate with a permanent marker. Label one side “pFLO” and another side “C” for control.
    4. Then, write your team name, class period, and date on the bottom of both plates.
  2. In this lab, we are using a technique in which you will plate your control and pFLO bacteria on the same plate. By drawing a line on the back of the plate and growing your experiment and control on the different halves you can compare results and minimize any variables. Be careful not to mix the control and pFLO bacteria when plating. Do not cross the center line on the plates!
  3. Plate the “C” or control side of both plates.
    1. Set a P50 (or P100/200) micropipet to 50 μl. 
    2. Suspend the bacteria in tube C by pipetting up and down.
    3. Carefully drip 50 μl on the “C-side” of both your plates.
    4. Using a cell spreader, evenly spread the cell suspension on the “C-side” of both plates. Do not cross the middle line. 
  4. Plate the “pFLO” side of both plates.
    1. Using a new tip, suspend the bacteria in tube pFLO by pipetting up and down.
    2. Carefully drip 50 μl on the “pFLO-side” of both your plates. Make sure that you do not cross the middle line.
    3. Using a new cell spreader, evenly spread the cell suspension on the “pFLO-side” of both plates. Do not cross the middle line.
    4. Do not dispose of the cell spreaders! Place the cell spreaders in the waste container of disinfectant.
  5. Allow 5 minutes for the plates’ surfaces to absorb the cell suspensions. 
  6. Give your plates to your teacher. They will be incubated  at 37°C overnight.
  7. Make predictions about what you expect to happen on each side of each plate.
You will label plates during the recovery step in part 4. Ask you teacher to help you label the plates if the class is not ready to do it as a group.

Write small and on the bottom of the plates.

Keep the LB/amp plate under tinfoil to protect it from the light.

There is a p50/p100 at your lab station.


​ 

Clean up

  • ​Dispose of all contaminated waste materials, tips, and tubes in the biohazard bag.
  • Pour ice into the sink.
  • Disinfect your work surfaces with ethanol or bleach. 
  • Wipe down your micropipets with disinfecting wipes.
  • Wash your hands.
  • Return all equipment as you found it - see image to the right.
Picture
Powered by Create your own unique website with customizable templates.
Photo used under Creative Commons from IBM Research
  • Home
  • Biology
    • Matter and Energy >
      • Building Data Tables
      • Graphing
    • Cell Transport
    • Animals >
      • Cells
      • Cellular Respiration
      • Digestion Biosynthesis
      • Biomolecules
    • HLA Matching
    • Plants >
      • Plant Structures
      • Photosynthesis
    • Mitosis
    • DNA to Proteins >
      • Double Helix >
        • X-ray Crystallography
      • Enzyme Lesson
    • Genetics
    • Evolution >
      • Battling Bacteria
      • Moth Gizmo
      • Mouse Evolution
      • Evolution and Disease
      • Evidence of Evolution
    • Ecology >
      • Ecology Reading Assignment >
        • Nutrient Cycles
      • Carbon Pools Reading
    • Ecosystems >
      • Animal Flash Cards
      • Human Impacts on Environment
    • Ecocolumns
    • Disease >
      • Disease Reading
      • Immune System Response
      • Emerging Diseases Project
  • FAQs
  • SEP labs
    • Transformation >
      • Transformation Procedure
    • HLA Sequencing
    • PCR
    • ELISA
  • DNA Extraction Cards